- Go to
 > Change password
 - Enter
- Current password in Current Password column
- Enter New Password in Password column
- Re-enter new password in Confirm New Password column
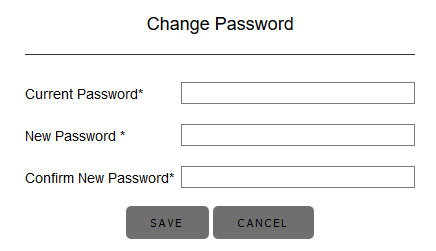
- Click on Save button
*New password will effective on next login.
- Go to > Click Account Information to view the account information
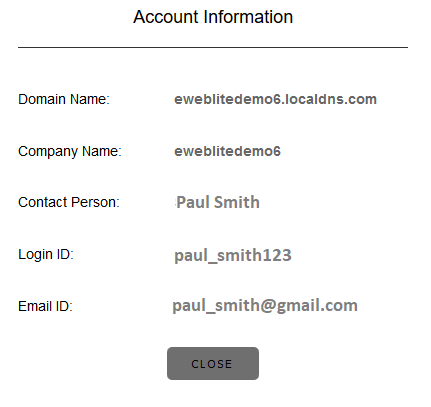
- Click Close button
Ximpleweb offers one of the widest choices of domain names for you to choose from. We offer one flat rate for new domain registration, domain transfer and renewal. So start shopping!
A fee of RM 382 for redemption/restore of domain names.
See more
- Ximple makes it easy for anyone to build a fantastic website, but a little extra guidance never hurts.
- The first step is to choose a theme for your new website. What's a theme? It's a combination of the code, colors, and general structure that will become the foundation of your website's appearance. Simply put, a theme is to a website what clothing is to a person – you can personalize things to express your own style and easily change to a different look whenever you want. All Ximple themes are responsive, which means they'll automatically adapt to the best fit for any screen size, so you can be sure your site will look great on mobile devices and computers.
- Click on the live preview to see a larger preview. If you like the way this looks, click Start Editing to go into the site editor. Changed your mind? Click on Close to return to browsing the theme gallery.
- Once you've selected a theme, you'll be prompted to choose your site address. If you already own a domain name or have something in mind, go ahead and type it in and then click continue.
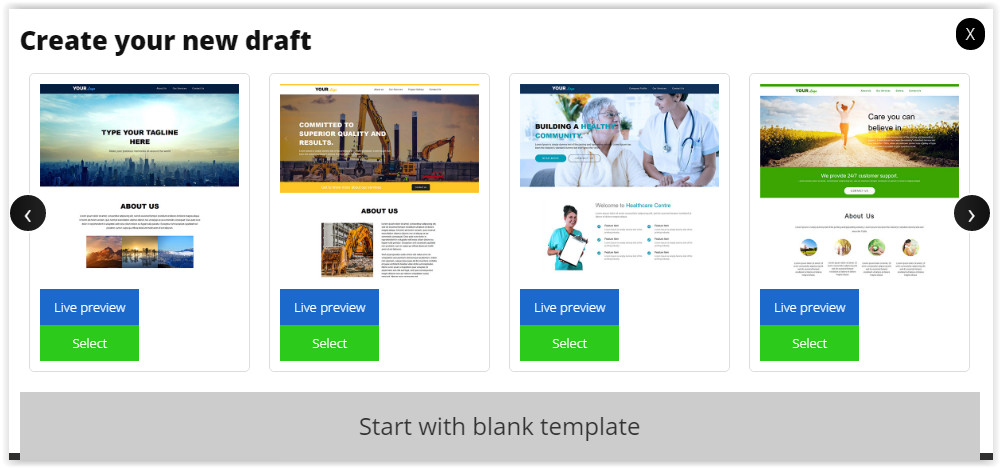
- Click button > Click My Website > Click Add New

- There are 2 option:
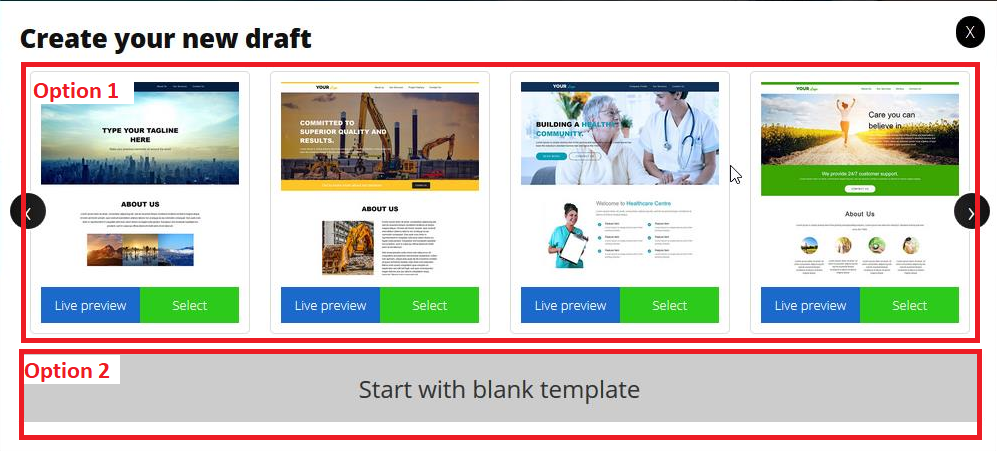
- Option 1:
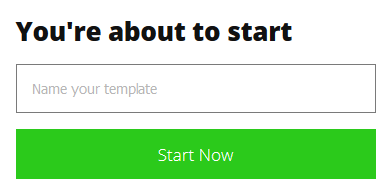
- Choose from template > Click Live Preview to preview the design or click Select to choose the template > Fill up Name Your Template field > Click Start Now
- Layout

- Choose from template > Click Live Preview to preview the design or click Select to choose the template > Fill up Name Your Template field > Click Start Now
- Option 2:
- Start with blank template > Click Start with blank template > Fill up Name your template field > Click Start Now
- Layout
- Start with blank template > Click Start with blank template > Fill up Name your template field > Click Start Now
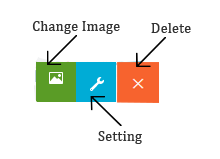
- Click
 (edit button) under Action column.
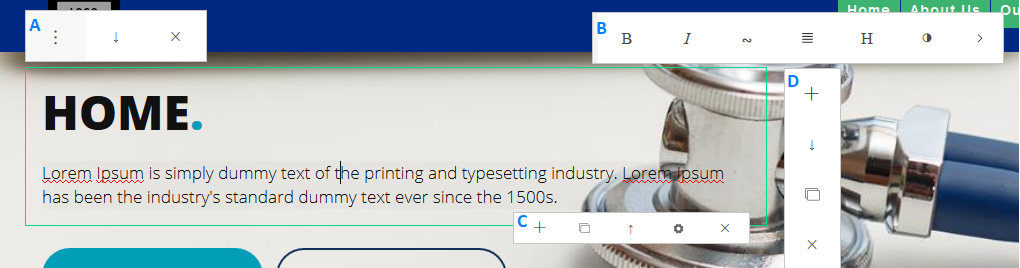
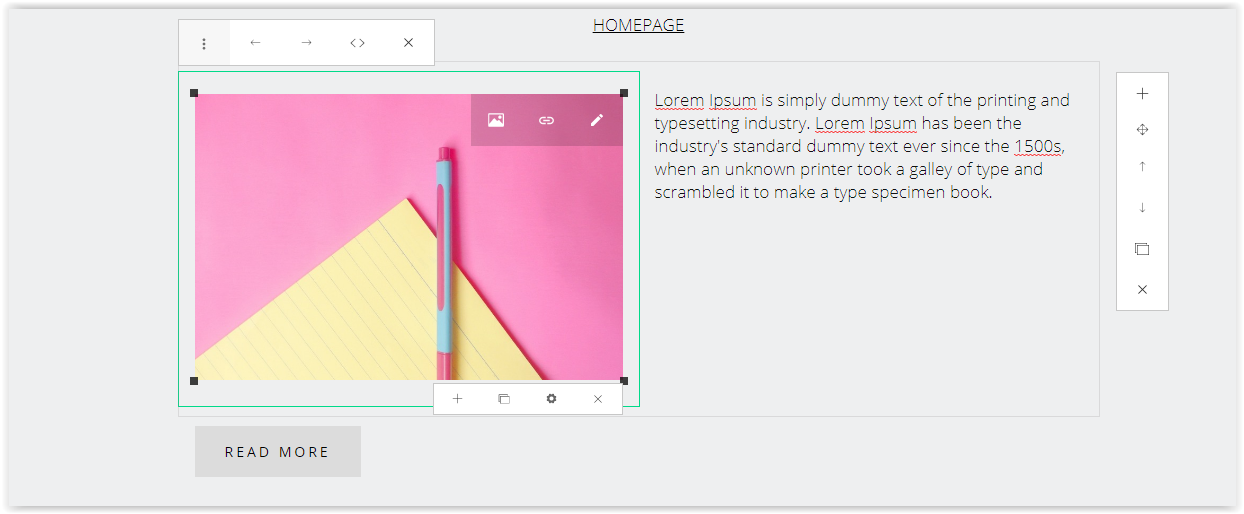
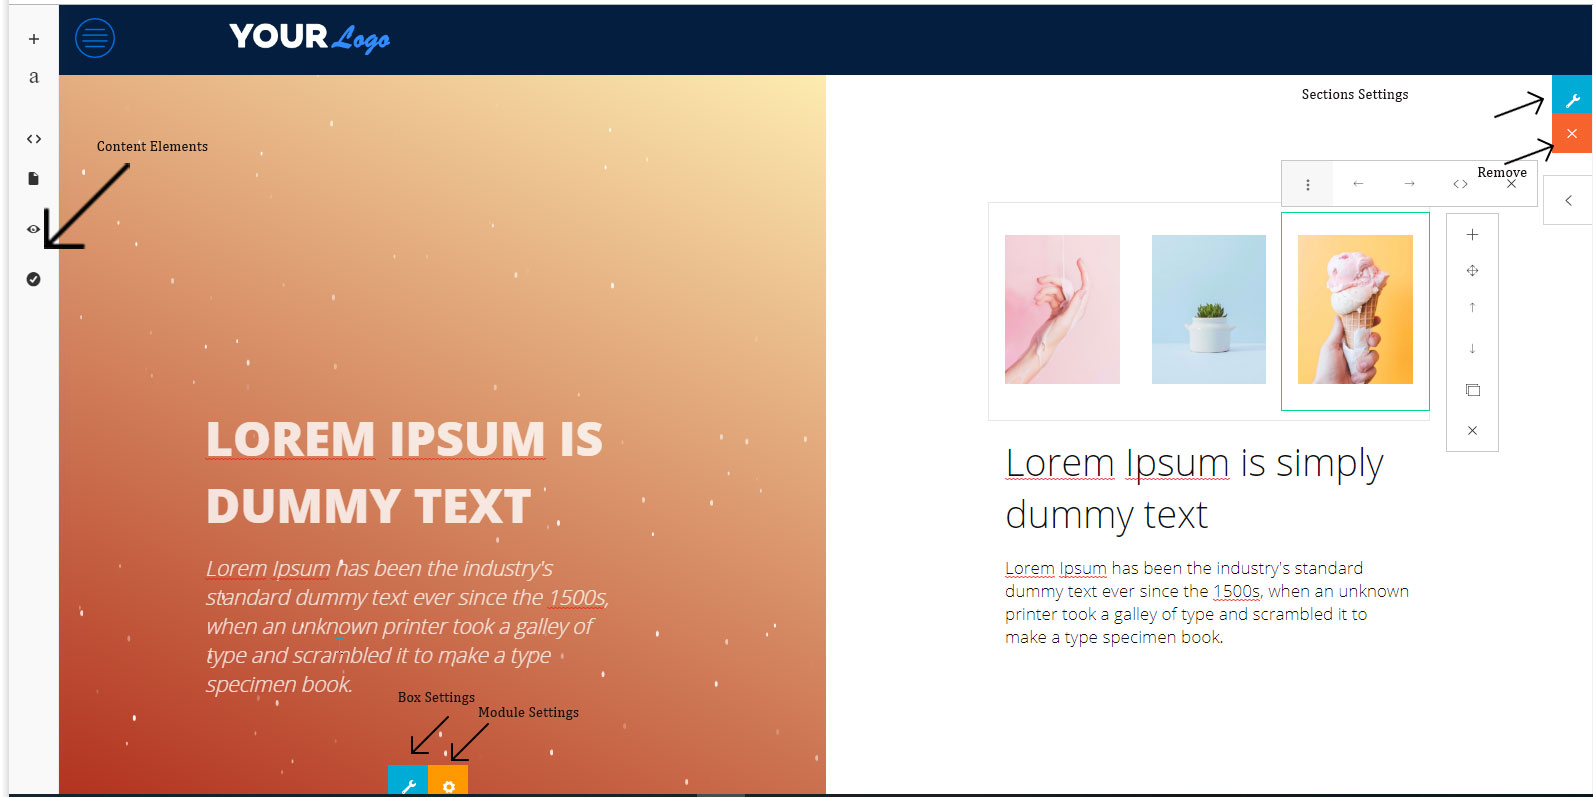
- There are 3 panels
- Panel A: edit/duplicate/delete the whole green box horizontally
- Panel B & Panel C: edit content within the greenbox
- Panel D: edit/duplicate/ delete the whole green box vertically
- Click
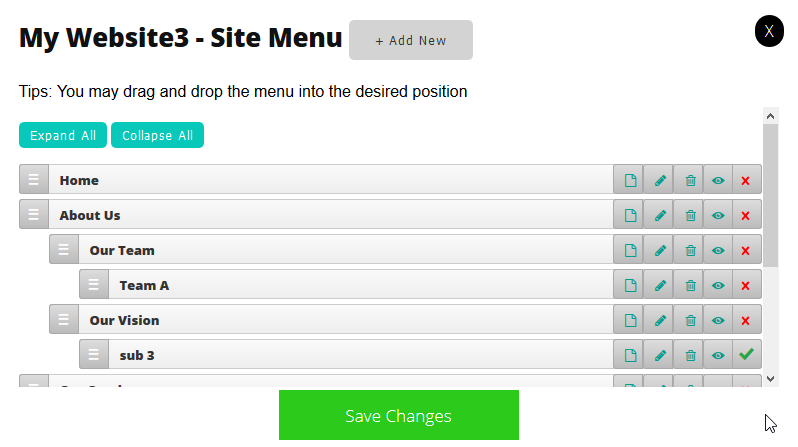
 (site menu button) under Action column
- Click Add New to add new menu
- Drag and drop the menu to rearrange the menu sequence
- Click Save button
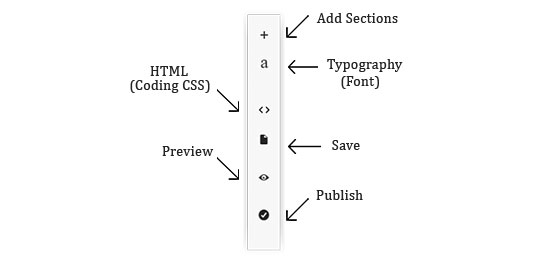
- You may save your work once ready with just only click on the save button on the left side bar as per picture below.
- Then, your website is updated now !
The way your content is written and displayed on your website can have a big impact on accessibility. When writing text and designing your website, ask yourself the following questions:
- Will the text still be easy to read when zoomed in or enlarged?
- Is there enough space between each line of text?
- Do the text and background colors have good contrast?
- Is the content written in clear, simple language?
- Are links easily distinguishable from surrounding text?
- Does linked text make sense out of context (eg, linking the phrase "click here to read about our mission" instead of only linking "click here")?
- Do all pages have a descriptive title?
You can easily make changes to text size, color, and font face from the typography tab. Click the Typography button to view and modify the styles for all of the different types of text on your website.
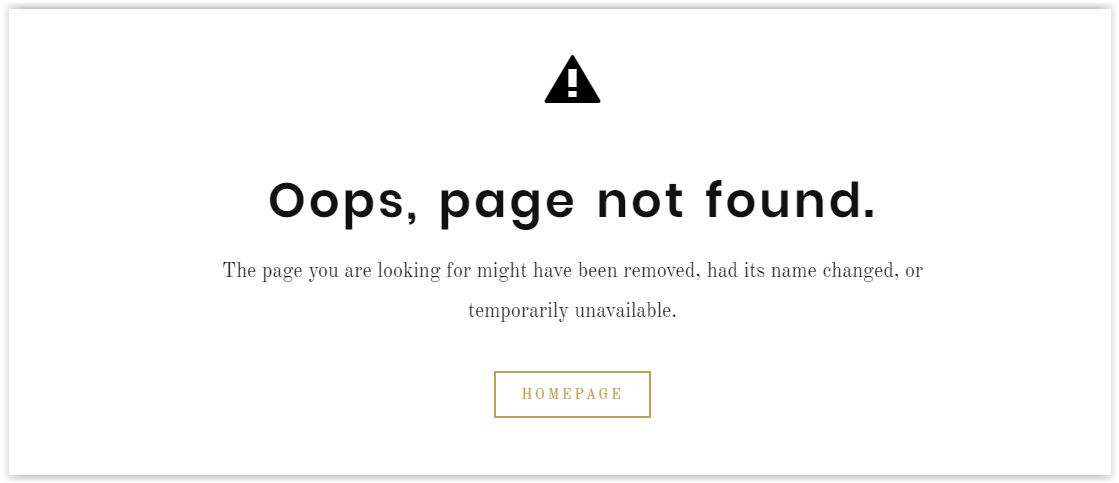
If someone visiting your site happens upon a page that does not exist, they'll automatically see a Weebly 404 Error Page like this one:
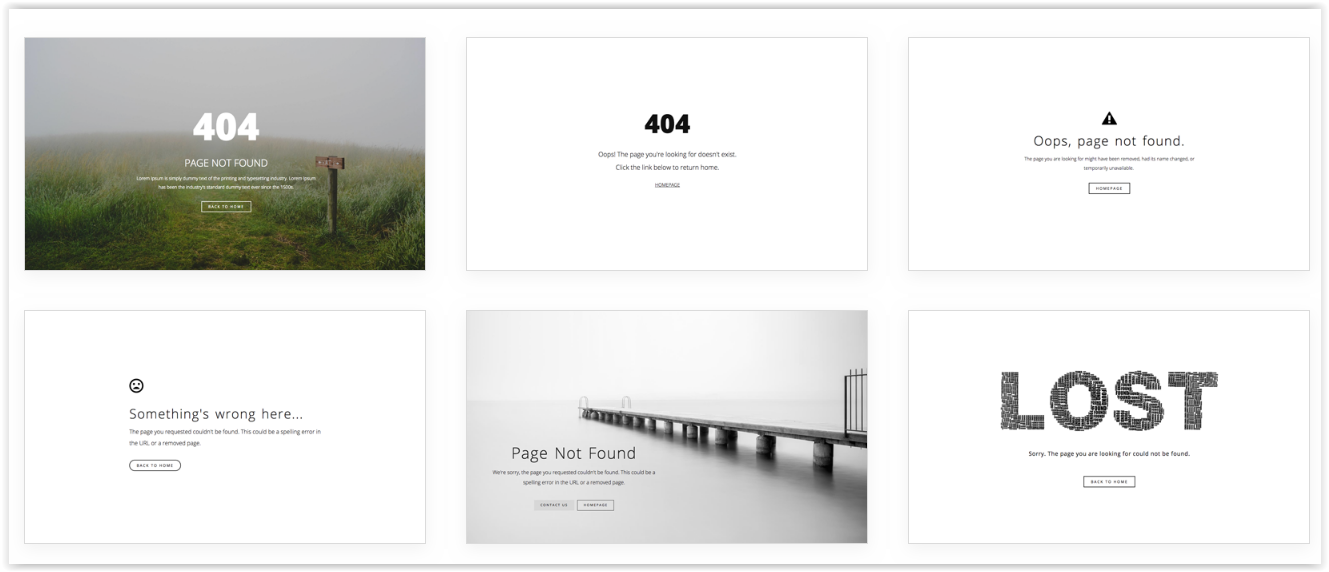
Ximpleweb have many example of template for Page Not Found as like below so then you may choose where is match with your site.
The error is very straightforward and essentially says, "The page you are looking for might have been removed, had its name changed, or temporarily unavailable." It works.
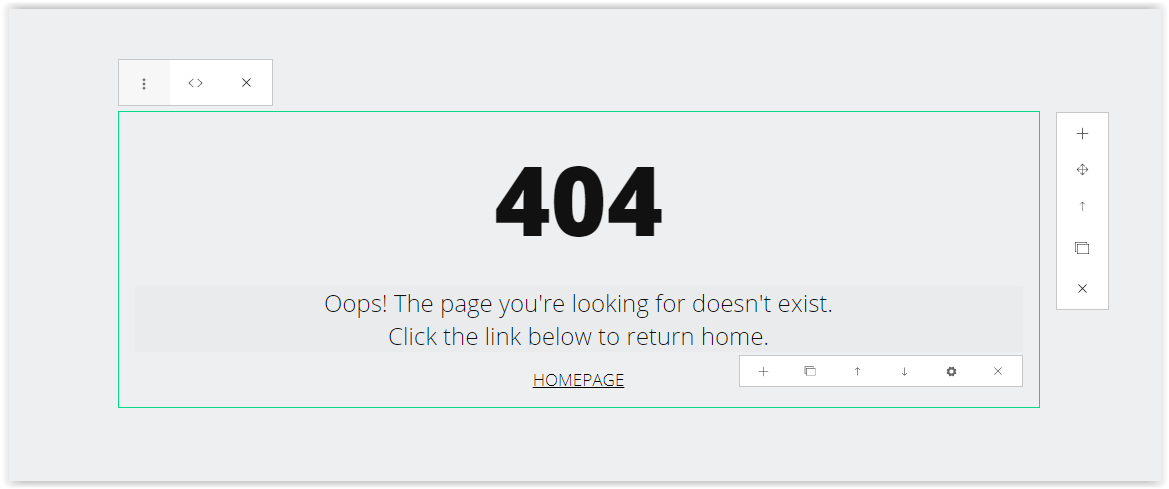
But what if you want your own 404 page (Page Not Found) instead of relying on Ximpleweb's default error message? You can easily do so. Click on the text and customize it by your own.
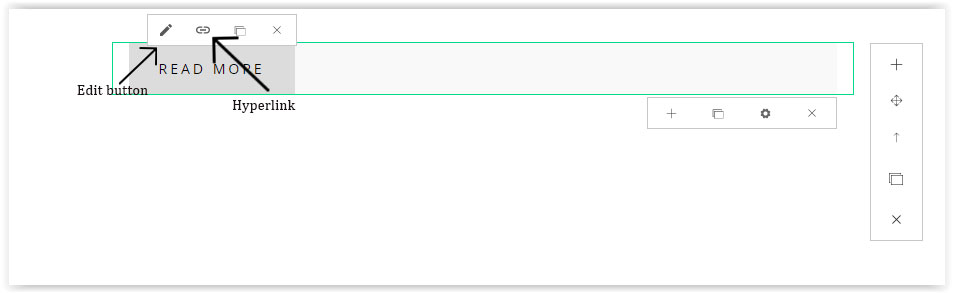
Using the "Read More" element is a simple way to keep longer posts from cluttering up your page, giving you more control over how much content is displayed to visitors.
Choose the section where do you want to add Read More link, then go to Hyperlink button and fill up the form given. That's it!
Pages are an essential component of your website – they'll display all of your content and give your navigation menu a sense of purpose. You probably already know how to create pages, so let's look at how to manage them.
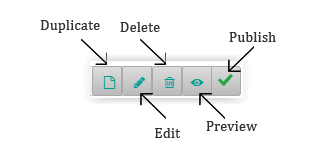
- Copy Pages
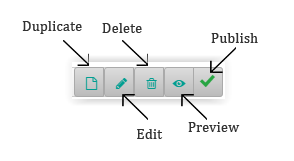
A page can be copied and used as the basis for a new page. To do this, just select the Site Menu tab and select the page you want to copy from your list of pages in the sidebar, then click the Duplicate button to generate a copy of the page.
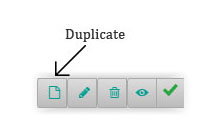
This will generate a new page at the bottom of your list of pages, with the same name as the original page. Click on the page to change its name and other settings, then click Start Now.
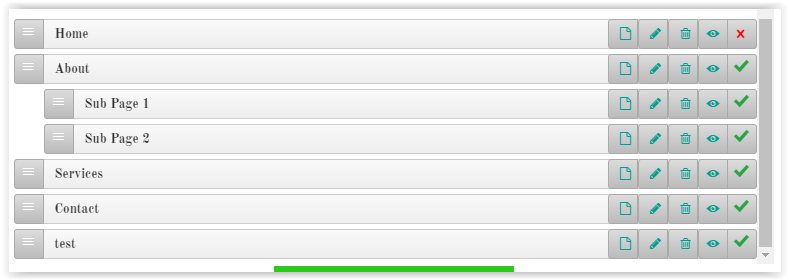
- Reorder Pages
As you add pages to your site, they will appear in the Pages list in the sidebar, and also they'll automatically become part of your site's navigation bar. Where a page appears on this Pages list directly controls where it appears in the navigation.
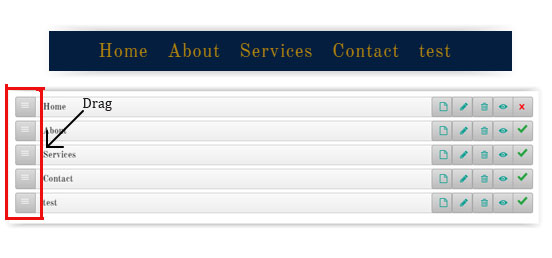
You can rearrange the order of the pages by clicking and dragging them up and down the Pages list. Dragging a page to the top of the list will make that page your Home (though you can name it whatever you'd like).
Changing the order of pages in the list will also change the order in which they're displayed in the navigation.
- Organize Subpages
As the number of pages you add outgrows the space on your navigation bar, additional pages will automatically be categorized under the menu.
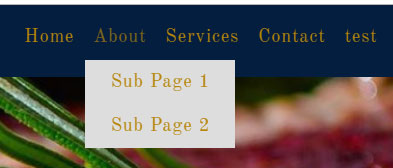
To do this, just drag a page or pages underneath and to the right of another page.
The navigation menu will show your main pages, and when you hover over them, your sub-pages will appear in a drop-down menu below them.
To create a new sub menu, just click on the Duplicate button then create your new sub menu pages and rearrange your subpages menu under your new menu selected.
- Delete Pages
If you would rather delete a page entirely, just select that page from the Pages list (site menu) in the sidebar, then hit Delete button at the bottom of the options listed. Confirm that you do indeed want to delete the page (or cancel if you changed your mind), and that's it!
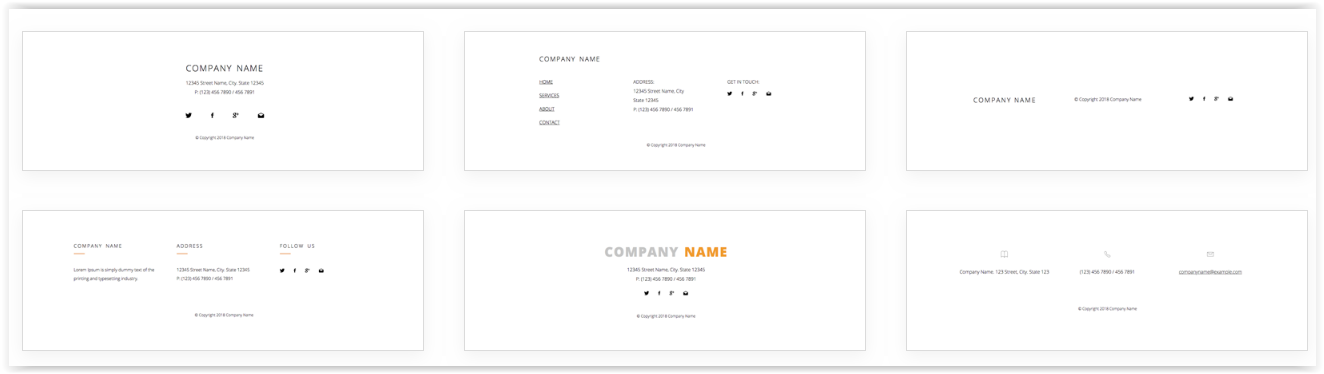
Pick any of footer template and customize it by yourself according what do you want.That's it! Use the content block element to edit your footer look interested within a minute.
- Arranging your content in columns is a quick way to give your pages a well-organized look, and it's as simple as dragging things where you want them to be.Improve editing experience with the flexibility to manage rows, columns & elements the right way (all without adding complexity to the HTML structure).
- When you mouse over an element, you'll notice a green border around the outside along with some buttons at the top. The border represents the boundaries of the element, and the buttons allow you to perform various actions. The center button is what you'll use to drag the element to a new spot on the page.
- Click and hold on the white rectangular button at the top of the element and then drag it to the new position. A vertical line will show up next to different elements as you drag near them to illustrate where the element will land when you release it. Once you've dragged it to the right spot, simply unclick to release it and drop it into place.
- Just like individual elements on a page, columns can be copied or moved to different pages using the arrow on the upper left. Click on either Move or Copy and then choose which page to move or copy the columns to. You can also delete a column and everything inside it using the x button in the upper right.
- Adding a gradient background is an easy way to make your content stand out. Just like solid color backgrounds, gradients can be added to individual sections on a page or to a single section to fill the whole background area.
- Click on the section you want to add a gradient to, and click Setting button. Select Gradient or Background color to change it then add your colors and adjust the settings.
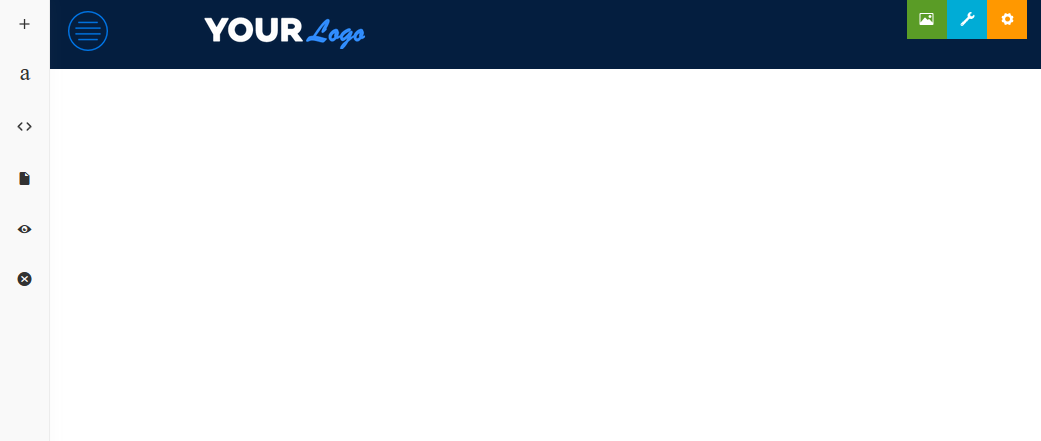
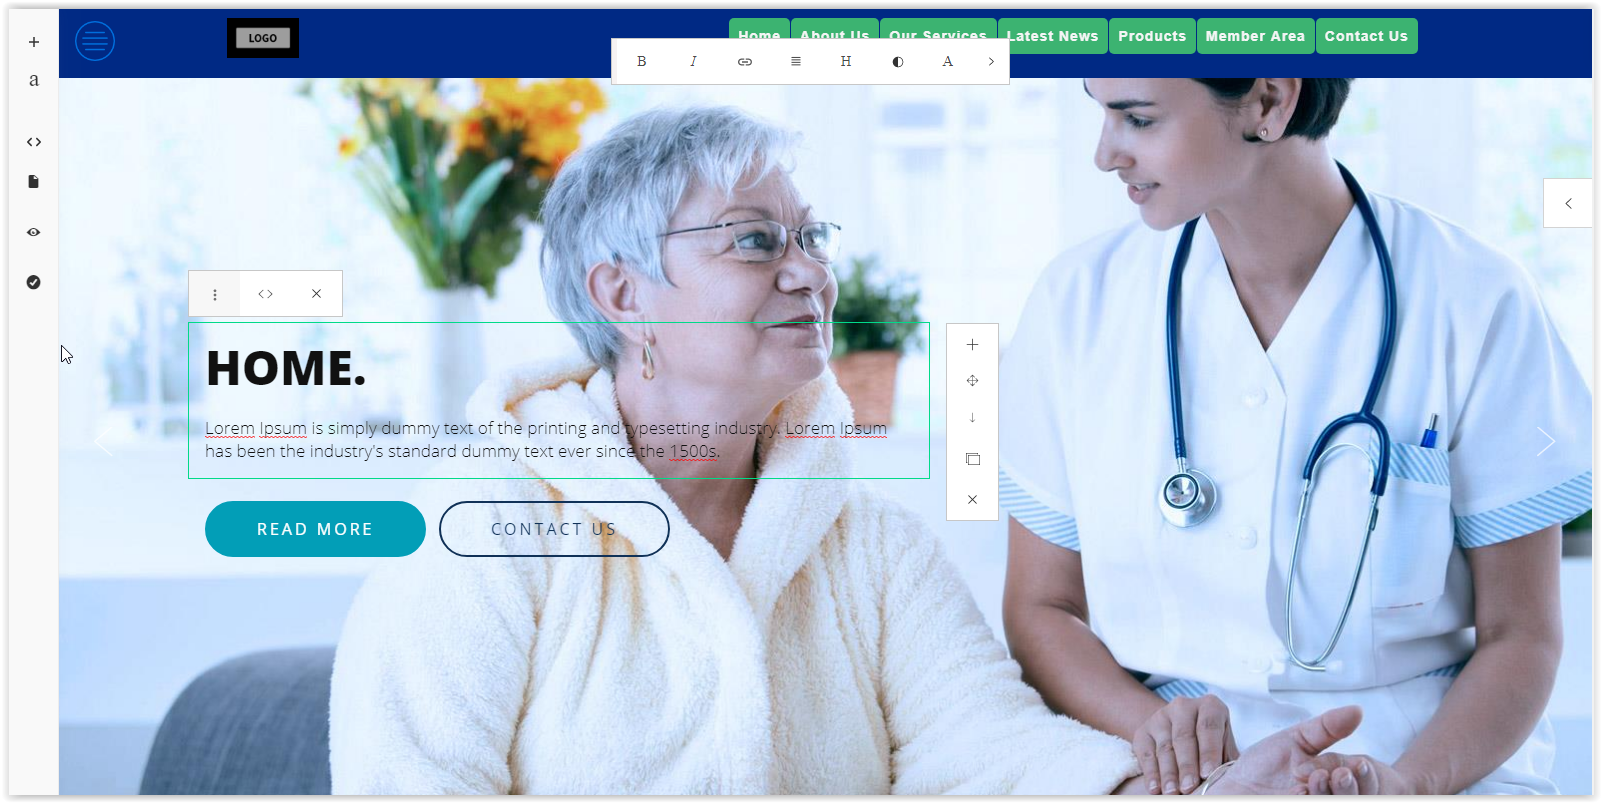
Every website needs a name, and you can choose to display that name on your website with text or as an image. Whichever you choose, it will be visible on each page of your site. You can also disable this completely, but let's take a look here at adding a logo image. Find the title logo or Your logo at the top of the page and mouse over it to reveal the options.Click on Logo to bring up the image upload dialog.
![]()
You can upload any standard image file (JPG, PNG, GIF), but your logo will likely look the best if it has a transparent background and a color that contrasts well with the background of your site.
Choosing the right fonts can take your website from bland to beautiful in an instant. While each theme has default font and color options built in, you're not stuck with those – you can change the look of virtually any text on your site from the Typography button on the left side bar and click Save button to save it.
Flexible Headers give you incredible creative control over the look of your pages. You can add and remove elements, customize the background, and adjust the height of the header area.
Click on the Add Sections button and find header element.Then, you may choose the suitable header for your site.You may also edit the header section according to the box element.
The header will have a few default elements in place when you add a new page, but you can pick a different layout by clicking on the Module settings and then on Replace Header Layout/image.
Though you can easily customize most of the fonts and images on your site, you can also make changes to a Ximpleweb theme start with blank template and customize it by yourself.
Customizing the backgrounds on your pages is a simple way to add personal flair and make your site stand out. You can add a different background to each section and header on your site, so your creative options are practically unlimited.
Backgrounds fill the entire width of the page and can be an image or background solid color.You can use your own files or choose from our galleries of optimized, high-quality media. Image and video backgrounds can be further customized with scrolling effects.
To use an image background, click Edit Background for the section you're working with. Select Image, and click add image. You can choose one from our gallery by clicking on the image thumbnail and then on the select button. The images in the gallery can be filtered by theme using the menu at the upper right.
To add your own image, click Upload Image and choose the file you want from your computer.
A solid colored background is a great solution if you want to make a bold statement or showcase special content on your page. Click the section you want to add a color to and then click Edit Background, then select Color.
Click the Change Color button to open the Color Picker. Drag the circle in the spectrum bar to the color you want, and then drag the circle in the color gradient field below to fine tune the lightness and saturation of the color. If you already know what color you want to use, you can simply type the hex code in the field below.
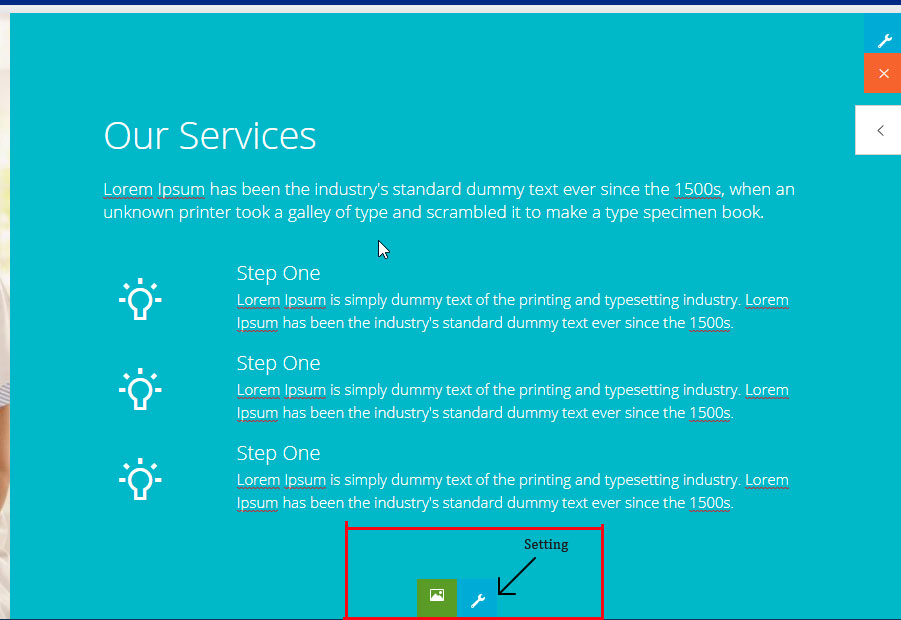
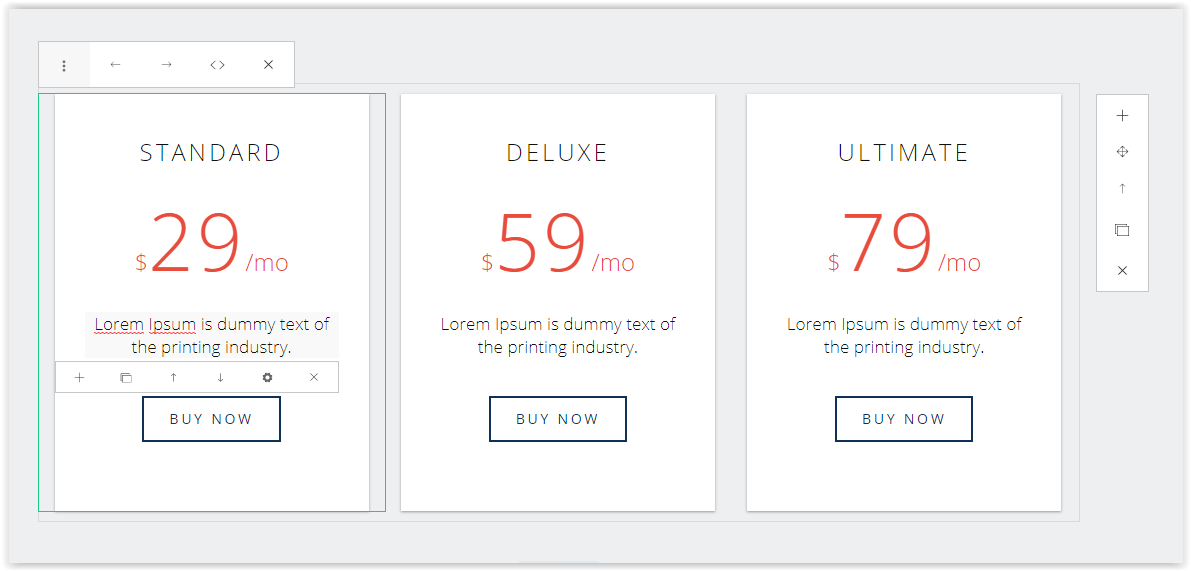
The Price Chart app is a great way to display pricing plans or similar information in a clean, attractive format.Choose the pricing table on the section element and customize it according your price on your site.
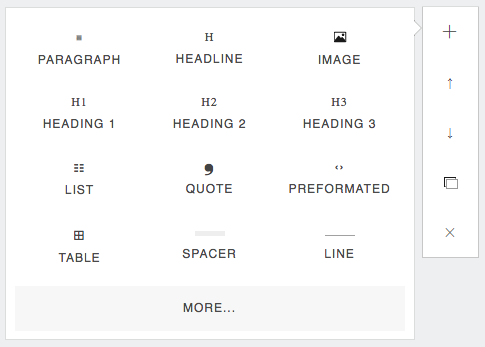
Ximpleweb Elements are the essential building blocks of your site. Nearly all the content you add to your pages will be built with Elements.Adding text, images, and more is as simple as going to the Content Elements and click an element onto your page.
The block quote element can be used to offset quoted text on a page or even to create an attention-getting headline. It's easily distinguished from other text elements since it has its own font settings.
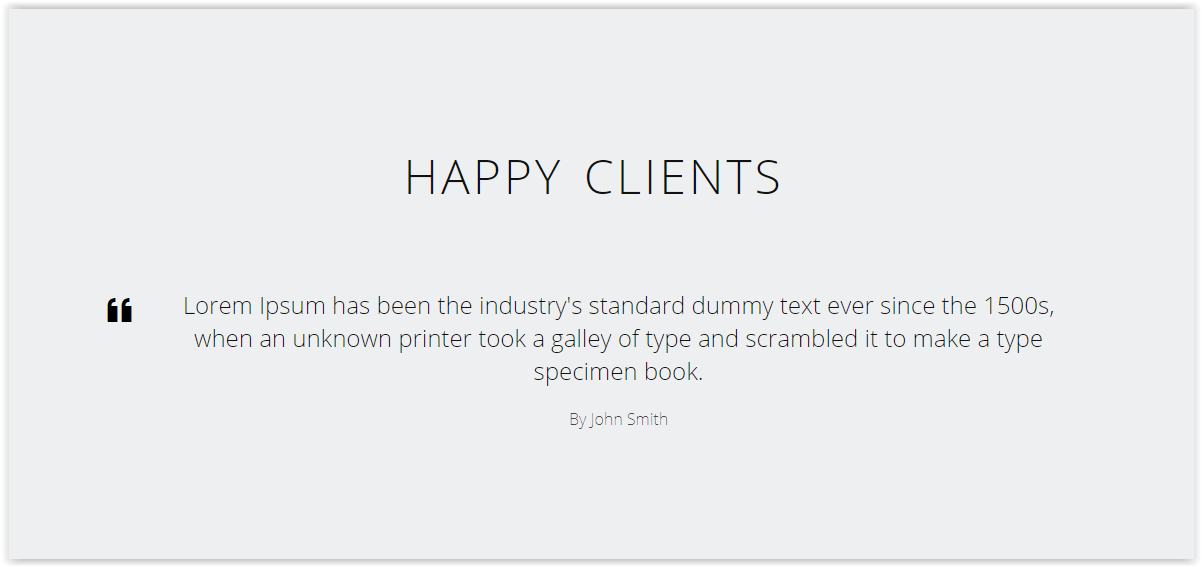
The element is located in the Add Sections > More section of the sidebar elements, and can be added to standard pages and blog posts. Simply drag the element to your page or post and enter any text you choose. In the above image, the block quote is positioned between a title element and a paragraph element to demonstrate the difference in text styles and additional spacing around the block quote.
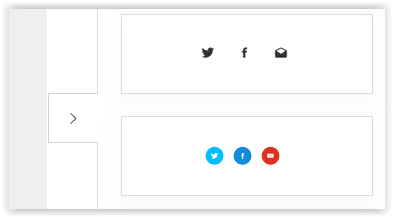
Adding links to your social network profiles helps your visitors find you online and attract even more followers.
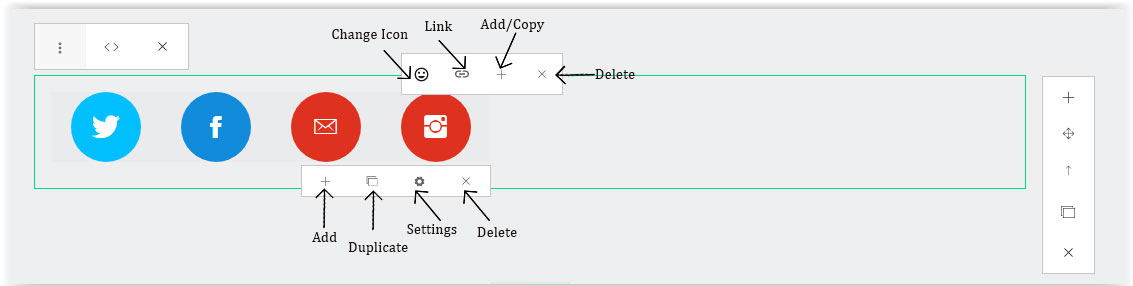
If you want to add new icon, click on the Add/Copy button and click on the Change Icon to change the new icon as per your requested. Once you've selected the icons you want and entered your information, you can change the order they're displayed in. Click on the element to bring up the settings and then click Reorder. Drag the icons into the order you prefer and click done to save the changes. You can also adjust the alignment and spacing for the element from within the settings.
Note: Don't forget to put in the links to your profiles – the icons won't show up on your published site if they don't have a link entered.
There are two ways to add pictures to your pages: Image Elements and Gallery Elements.
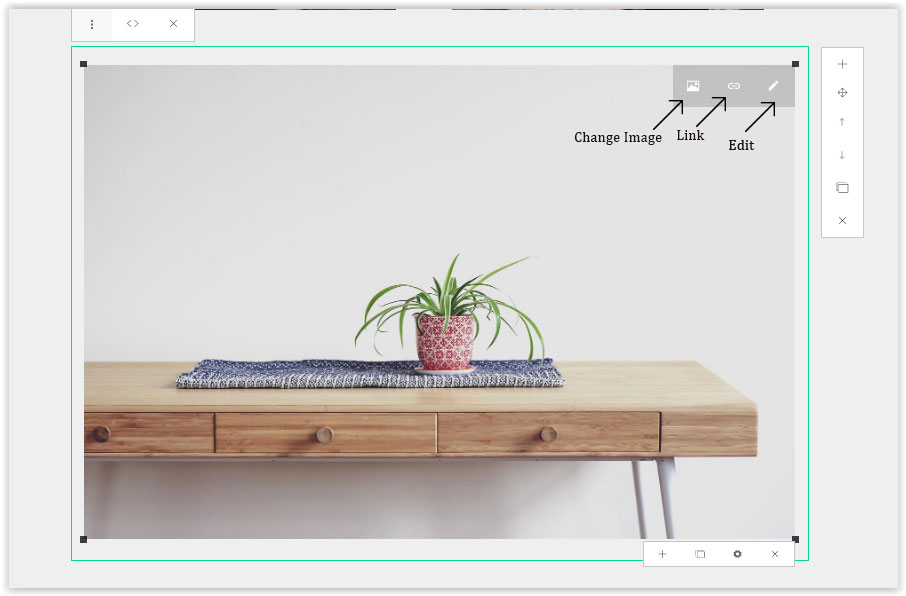
Single Images
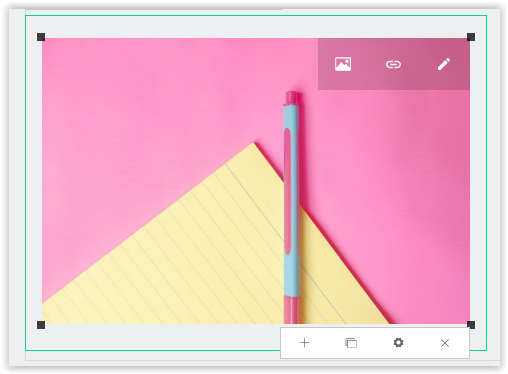
From the Build tab, drag the image element to a page. Then click on the element to open the image selection dialog box.Here you can upload an image from your computer by dragging the file from a folder directly onto this window or by clicking the green upload button and locating the file on your computer.
In addition to the Edit and Replace image buttons, the following options are available:
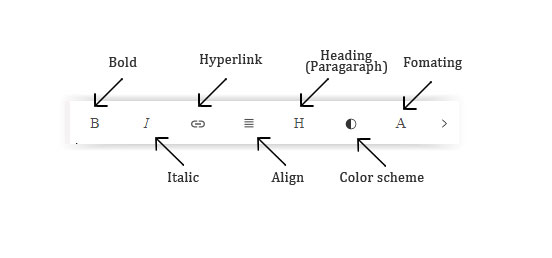
Adding written content to your site is as easy as dragging any of our text elements to a page. The primary text elements are Text and Title.
Title: For adding an H2 headline before a paragraph, or anywhere on the page when you want some text to stand out. This text is larger and more eye catching than paragraph text. Text: This is your paragraph text, which you'll want to use for the majority of the written content on your site in order to provide a consistent look. Drag one of these elements to your page and click on it to start typing.
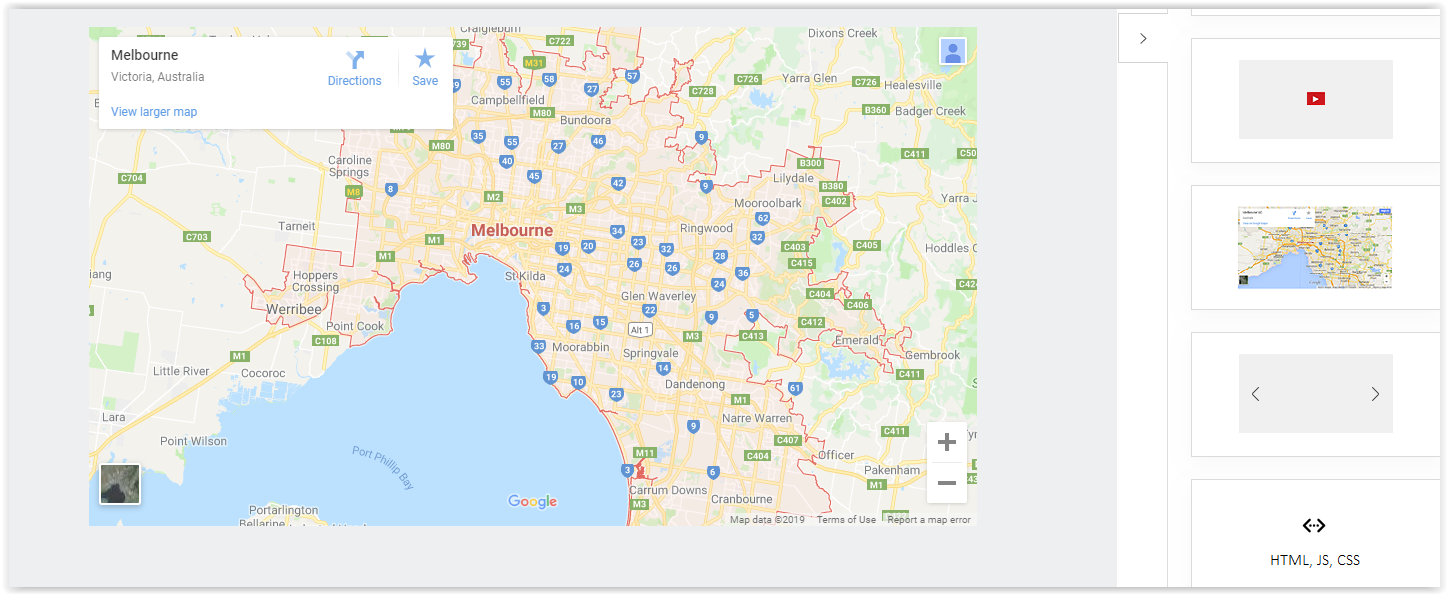
If your business or organization has offices that site visitors can visit, it's helpful to include a map to that location on your site. And we have a built-in Google Maps element that helps you do just that.
Start by dragging the Maps element to a page on your site. It's under the Basic category of elements.
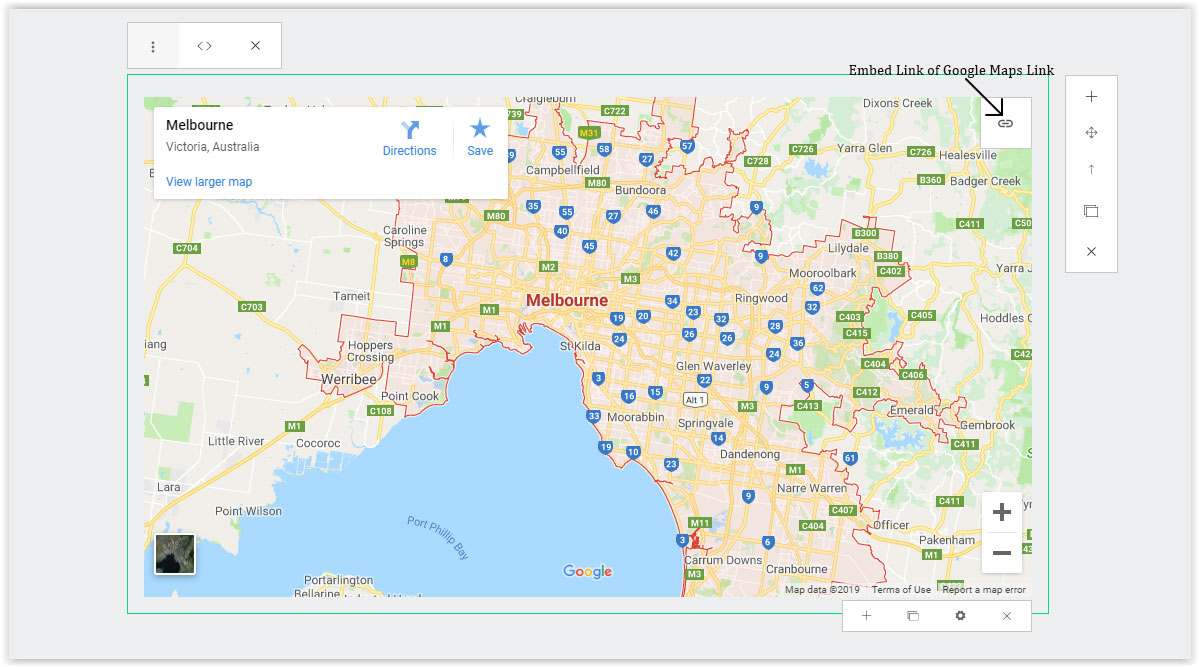
Select the "Embed map" tab and copy the code they provide there.Copy the link given on the google maps and then paste this code to your site using our Embed Code element. Your map will show up as soon as you click out of the element.
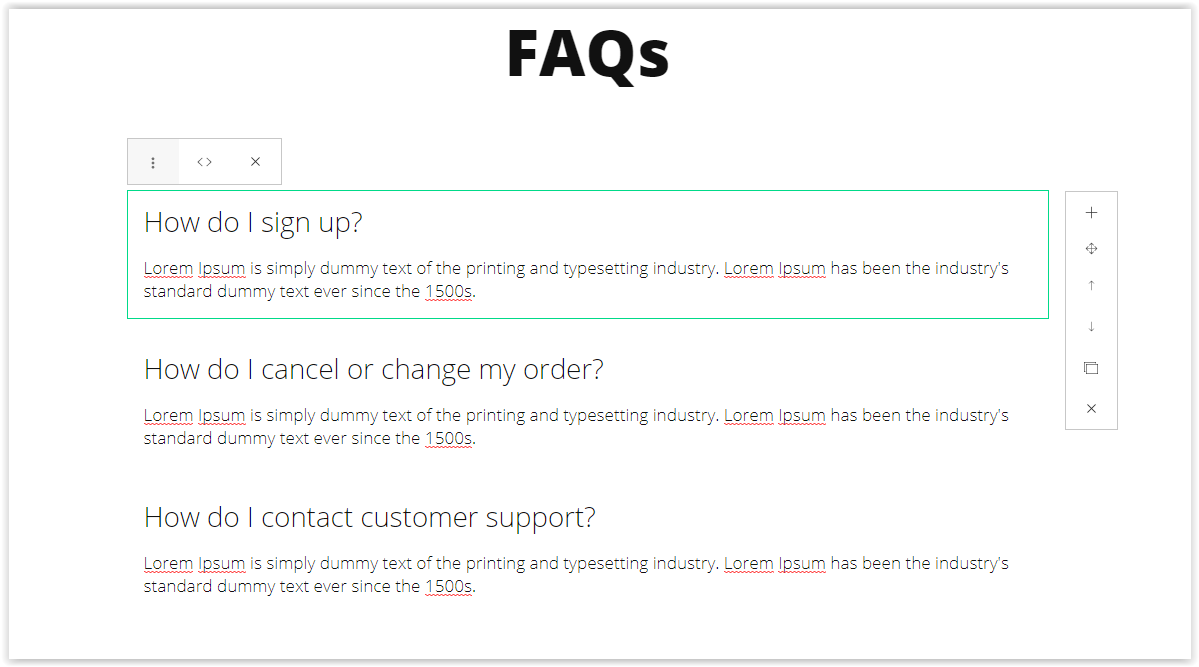
FAQ is a quick and easy way to create a collapsible list of items in a question and answer format.
Click on the side bar Add Sections button and choose Help, FAQ element and drag the element to the page you want to use it on.Customize it by your own itself. That's it!
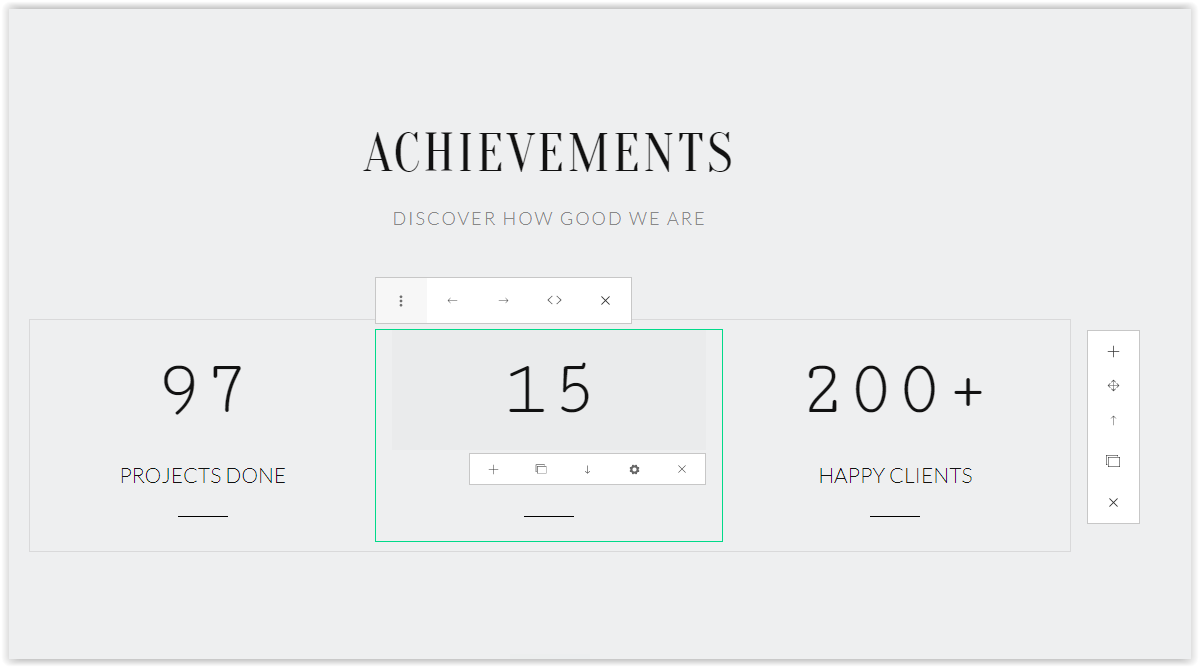
Do you have statistics or numeric information you'd like to display on your site? The Counter app adds a dynamic, attention-getting animation using the information you enter. You may edit the information while click on the Edit button easily.
There are several ways to create a link to another site, a page on your own site, a downloadable file, or an email address: a Text Link, Image Link, Button Link, and Navigation Link.
Text Link
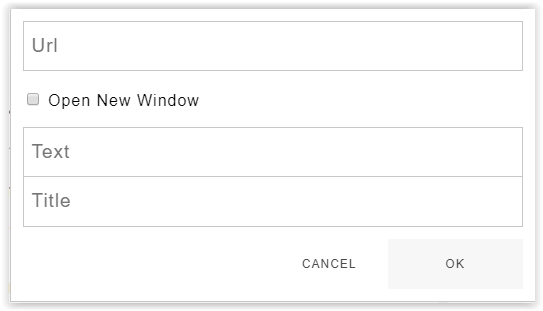
Any text you enter into a Text or Title element can be turned into a link (or hyperlink).First, highlight the text you want to link, then click the Hyperlink button in the text toolbar.This will open the link dialog box, where you can select the kind of link you'd like to create. Clicking on one of the link options will expand it, and clicking again on that option will collapse the list back to choose a different type of link.
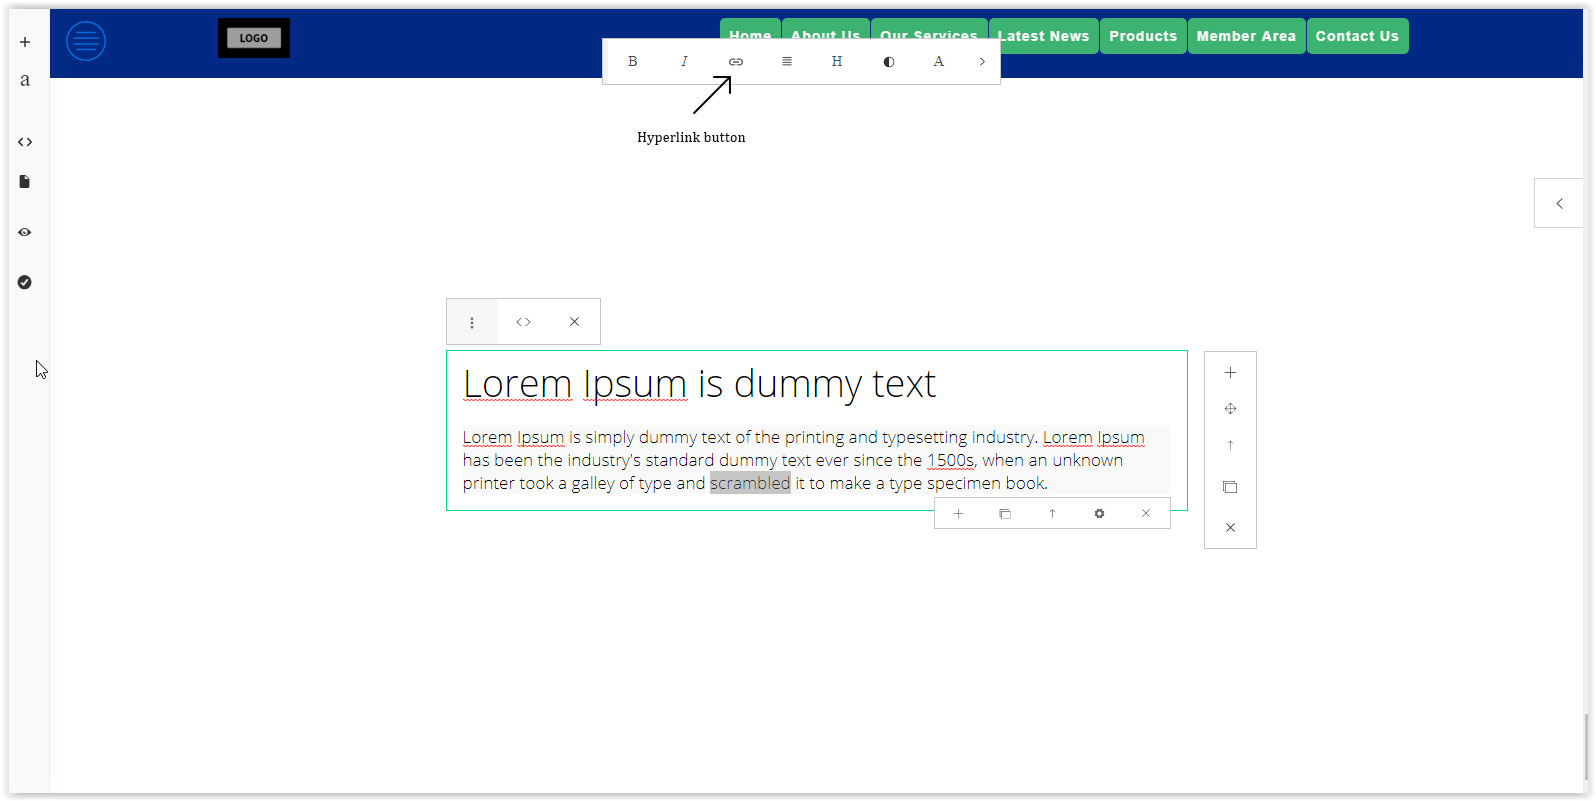
Image Link
You can also turn any Image element into a link. Click the image you want to use, then select Link from the image toolbox.
Button Link
The Button element creates a handy call-to-action button which links to other sites, pages on your site, files and email addresses (see the pattern?).
Drag a Button element on to your page, enter any text you'd like, though the ideal length is no more than five or six words. Then select Link from the toolbox, and you'll see your standard link options to choose from.
Once all the content and design is ready, you may click on the Publish button to publish your site into a public.So now, your website is ready to view by public!
If you change your mind again, you can re-publish the site at any time using the Publish button in the upper left corner of the editor.
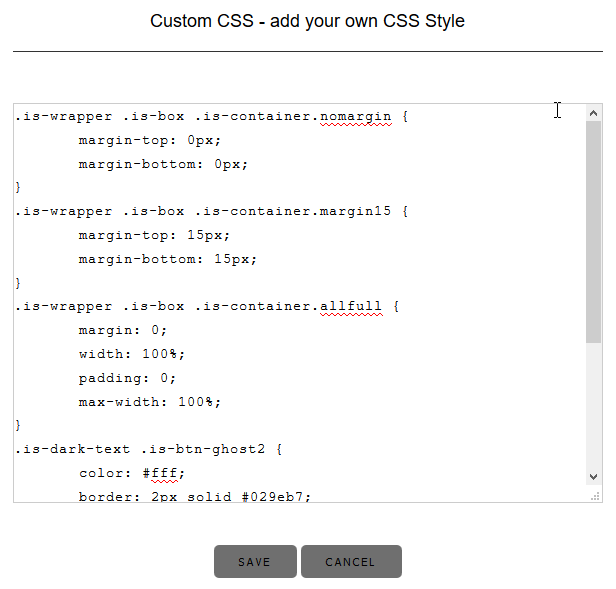
- Go to > Click Custom CSS
- Insert the CSS at the editor > Click save button
- Go to > Click Meta Information
- Enter
- Page title in Page Titlte field
- Page keywords in Keywords field
- Page description in Description field
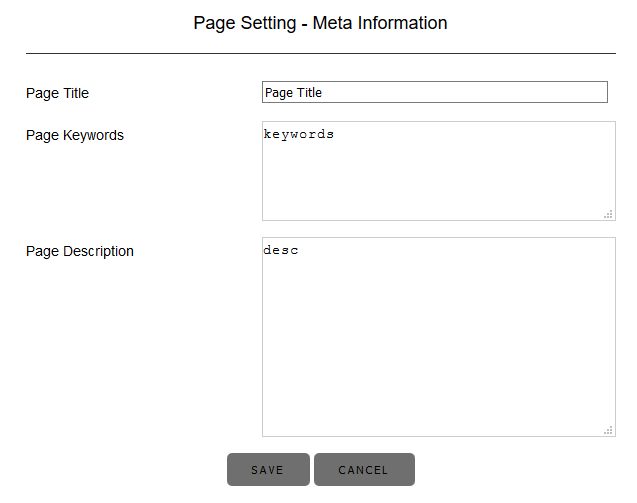
- Click on Save button
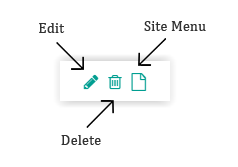
- Go to and choose your website that wanted to delete and click Site Menu button as per picture below:
- Choose the pages that wanted to delete then click on the Delete button to remove it from site.
Choose the row or section that wanted to remove and click on the Delete button to remove it from your site as below mentioned.